I’ve come a far way with my training. I don’t usually get many first anymore because I’m working on perfecting my flying skills, and not learning anything new. However I just finished a flight with a new first; night flight. Night flight is mandatory for students to obtain, and in order to get their private pilot license, we need at least 5 hours of it. I just got 1.9 hours of night time so far.
Night flight is typically conducted the same as day flying. The major difference is that more emphasis should be made at looking at the flight controls while in the air. Just like flying in the clouds, or under foggles, night flight doesn’t offer many ground references. There isn’t a horizon, and on moonless nights, it could appear like you’re flying in a black hole. It’s important to understand the illusions associated with night flight, and also IMC conditions.
I got to the airport around 5:30pm local time. I did the normal preflight briefing; paperwork, weather, and weight and balance. After I got the keys for N157LH, I walked across the ramp to preflight the airplane. As I unlocked the door, the sun was just going behind a hanger. In order to get credited with night time, you need to be flying after 30 minutes past the sunset time. So with the sun setting at 6:00 pm, I needed to wait until at least 6:30 to takeoff. If I took off at 6:25, than those 5 minutes wouldn’t count as night time. As I preflighted the plane, the sun sank lower and lower until it was completely set. By 6:20 my instructor and I were in the cockpit. It takes more than ten minutes to start the plane, taxi to the runway and go through all the checklists so we weren’t worried about waiting the 30 minutes.
Taxiing
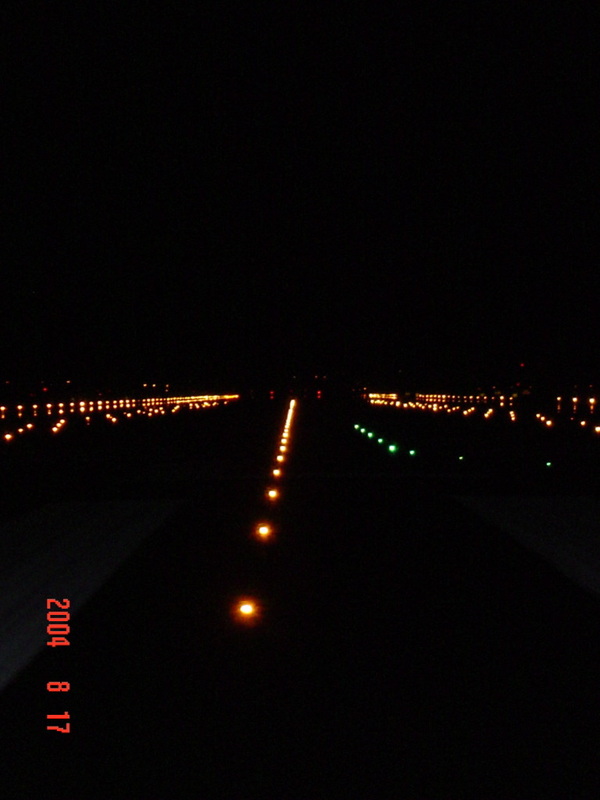
The biggest thing I noticed about taxiing at night is that even though there are the blue taxi-way edge lights, it’s still difficult to see where an intersection is. Unless looking right down the taxi-way, adjacent lights, for an adjacent taxiway look out of place. Other than that, it’s the same as taxiing during the day. After I got to the runway hold position, I set the panel lights for minimum brightness and got everything ready for my flight; lights on, flashlight ready, maps unfolded. I radioed to the tower and received the takeoff clearance. As I taxied onto the runway, I looked down the runway. The sight of looking down a 6000 foot runway with the edge lights on is remarkable. It looked like the lights went to infinity.
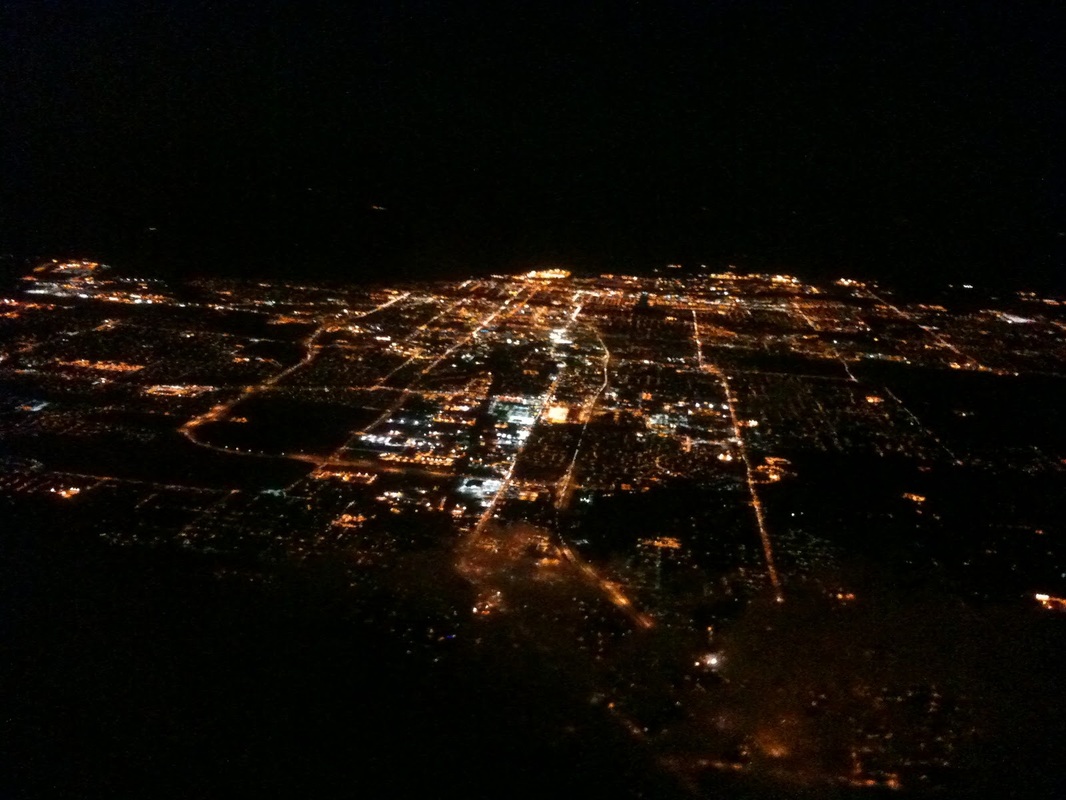
A similar scene to what I saw
|

Looking down a runway
|

Blue taxiway lights
|
Flight
As I climbed out of the field, I couldn’t help looking out the window. The sight was exactly what pictures and movies make night flying look like. There were intersections of roadway lit up, bodies of water without lighting, and I was able to see the entire outline of Long Island by the time I was at 2000 feet. I monitored the instruments carefully and kept enjoying the view. As I made my way out to the practice grounds, my instructor and I went over the illusions. Coriolis, elevator, somotogravic, and all the others. Once in the practice area, I practiced steep turns. I got the plane configured for the maneuver and went over the procedure to execute a steep turn in my head. 45° bank, maintain 3000 feet and keep my airspeed at 90 knots. I rolled into a left steep turn. I forgot that I was flying at night but realized once I started the maneuver. Without the horizon, it’s hard to tell if the nose is pointed down or up. I kept fluctuation between 2900 feet and 3100 feet. As I rolled out, and leveled the wings, I checked the instruments; not bad for my first time, and at night. After practicing a steep turn to the left, I practiced stall recoveries. I did well on these, mainly because it’s almost the same as doing them under the hood. It’s even a little easier since I have a few ground reference points.
As I was flying I realized that while it’s the most important thing, altitude depiction is very tricky at night. While I was at 3000 feet, it seemed like I was at only 1000 feet. And as I descended to 1500 feet, my perception of height above the ocean wasn’t any different. Also, lights can be tricky. At one point I thought that a string of lights was the horizon. However, my instructor corrected me. The lights I saw were actually a line of airplanes inbound to land at Kennedy Airport. There were always at least 10 lights in line, stretching over 100 miles (my instructor said. I couldn’t tell the distance). Finally, after getting a little more use to flying at night, we headed back to Republic for landings.
Landings
Like everything else, night landings are the same at night as during the day. However, the perception of the runway changes drastically. The first landing I did, my instructor had to put power in himself because I would have crashed well before the runway threshold. After 2 or 3 attempts, I got the hang of it. The trick to night landings, or at least my philosophy, is to come in high. This allows you to point the nose down at the runway. Doing this allows the lights to shine on the runway. Seeing the runway is obviously better than not seeing it, so the landing can be made more efficiently.
After 1.9 hours, we taxied back to Farmingdale’s ramp and locked the plane up. My instructor was happy with my first night flight, so I was as well. My next night flight isn’t for another month or so, but next is cross country work.
Today was a great lesson. I made good progress with my short and soft landings and takeoffs.
Soft Field Takeoff
I started the lesson with a soft field takeoff. The goal of this maneuver is to takeoff safely and efficiently from a soft field, such as dirt or grass. I did all my pre-takeoff checklists and lined up on the Alpha side of runway 32. Once I got clearance for takeoff, I put in 25 ° of flaps and lined the plane up with the centerline. Without stopping, I added full power and brought the controls fully aft, or back. What this does is it allows the nose wheel to come off the runway as soon as possible. The longer it’s on the runway, the less efficient the wheel is (due to small bumps in the grass). Today I was practicing on Republic’s asphalt runway, but it was a simulated soft field. Within 2 seconds of the nose wheel lifting off the runway, I felt the main gear wheels lift as well. Once all wheels were off the ground I lowered the nose so I could stay in ground effect. The purpose of this is to allow the airplane to gain sufficient speed for a climb. With the controls fully aft, the plane rotates at a slower speed. My first maneuver of the day was successful. I climbed out at 79 knots and made left traffic for a landing
Soft Field Landing
The first landing I tried was a soft field. The goal of this maneuver is so set the wheels down as softly as possible, so they don’t dig into the dirt or grass. In order to do this, I did a normal approach to landing until I was about 20 feet off the runway. Once there, I brought the power back to idle so I could do my round out. In the round out, I added the extra power, which allowed me to float in the ground effect. This allowed the plane to touch down softly. As I allowed the wheels to touch down, I held the controls aft. If the nose wheel strikes the ground too hard, it could make a divot in the grass and flip the plane over. To prevent this, you keep the controls aft so the nose wheel stays off the ground until the plane is going as slow as possible. Once all wheels were on the ground I took the flaps out and performed the touch and go for another landing.
Short Field Landing
After a few more soft field landings, I started practicing short field landings. Luckily at Republic Airport, the runways are both over 5000 feet long. I’ve never needed more than 1100 feet for a landing or takeoff since I started my training; however, not every runway is 5000 feet. To practice a short field takeoff, we simulate that the runway is much shorter. I picked out my spot on the runway, the first centerline stripe, and aimed for that. In order to stop in the quickest distance, the approach speed is 5 knots slower than usual. Normally, my approach would be at 65 knots, but for the short landings, I came in at 60 knots. As I got over the chevrons at the beginning of the runway I took out all power. As the plane came over the runway threshold, I tried to keep the wheels off the runway for as long as I could. I put the plane down at the end of the first stripe; about 120 farther than I wanted. Fortunately the practical test standards are 200 feet so I was well within limits.
Because we didn’t do any taxi-back takeoffs (land, taxi off the runway and then taxi back to the runway) I couldn’t practice the short field takeoffs. I’ve tried these many times in the past so I ‘m pretty comfortable with them anyway.
Every pilot license has certain criteria which need to be met for a student pilot to obtain it. The first license any pilot anywhere, no matter what, gets is the private pilot license, or PPL. Some of the requirements for the PPL are a minimum of 40 hours flight time, 10 hours solo time, and 3 hours BMI time. BMI time is also referred to as “under the hood” or instrument flying simulation. What they all mean is that while flying with an instructor the student puts on foggles. Foggles look like sunglasses but block the view of the outside world to the person wearing them. There is a cut out on the bottom of each lens so that the wearer can only see the control panel of the airplane and not look outside the windows. The purpose of this is to practice flying with no outside references, or flying in the clouds (instrument flying). So to get a PPL, aside from passing the flying and oral tests, the student also needs 3 hours under the hood time.
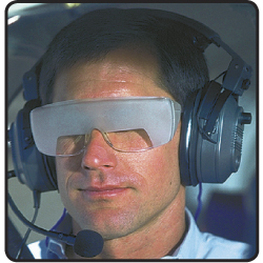 A pilot wearing Foggles Yesterday, my lesson was 90% under the hood. I took off and at 1500 feet, after doing the climb checklist; my instructor told me to put the foggles on. Once on, I flew the plane out to the practice grounds, over the ocean. When students wear the foggles, the instructor usually tells them what heading to turn and what altitude to stay at. Personally, I like flying with foggles on. Not because I can’t see outside, but because it make me a better pilot. For example, it’s easy to keep the wings level while you’re looking out to the horizon. Once the horizon changes its angle in relation to the dashboard of the plane, that means you’re turning the airplane. However, with no outside references, like the horizon, the student really needs to make sure he or she is watching the instrument panel closely. Flying under the hood really strengthens a student’s ability to scan the instruments. Having a good scan is paramount to being a good pilot.
Once in the practice grounds, my instructor had me do slow flight, and stall recoveries first. My slow flight was good. Unfortunately, when I do slow flight without foggles on, I watch the instruments a lot. This isn’t exactly what you’re supposed to do. I should be looking outside more than inside, but I developed a bad habit that I’m trying to break. Because of this habit, my slow flight under the hood was good. I did a climb, a turn, and a descending turn in slow flight. After that, the stalls were next. As I got the plane configured for a stall, I realized that the recovery was going to be harder without the outside references. My instructor must have been reading my mind because as I was thinking that, he told me that I need to just recover from the stall as I would if I wasn’t wearing foggles. The recovery is the same, except for the fact that I’ll be looking at the instruments and not the ground outside. As I stalled the plane in the power off configuration, I realized I was losing a lot of altitude. I quickly nosed up, but put the plane into a secondary stall. The secondary stall occurs when recovering from a stall; the nose is raised before sufficient air is flowing over the wings. I practiced this stall along with the power on stall multiple times before moving on.
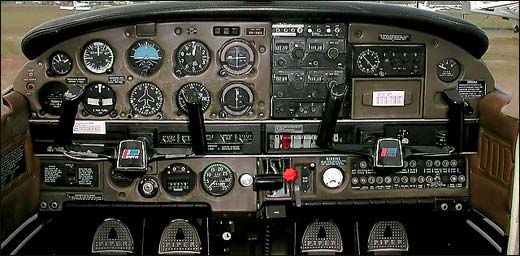 Piper Warrior cockpit. What I was looking at all lesson After these maneuvers, my instructor had me track the Deer Park VOR. I’ve tracked VORs many times by now so this wasn’t too much of a big deal under the hood. I identified the station, selected VLOC on the GPS and turned the OBS to the station. Once my instructor saw me do this, he told me to break off from the 205 radial TO Deer Park VOR, and head back out over the Atlantic. Once there, I practiced unusual attitude recoveries. Without foggles, I really like these. In order to practice these maneuvers, the instructor changes the plane’s banks, pitch, and power while the student has his head down so he can’t see outside. So while wearing the foggles, I put my head down and enjoyed the change in G’s while he maneuvered the airplane. As he was doing this I thought to myself the recovery procedures. Pitch up bank: add power, lower nose, neutralize ailerons. Pitch down bank: power to idle, neutralize ailerons, nose up. I heard recover over the headset and simultaneously looked to the attitude indicator, grabbed the throttle with my right hand, and the control yoke with my left. I interpreted the instruments and determined I was nose high, banking right. I immediately added full throttle, lowered the nose, and rolled the plane back to the left. Perfect. It’s much harder to do these while having to look at instruments instead of the earth. The big difference is that while recovering from looking outside, the horizon is a large attitude indicator. Because of peripheral vision, I don’t need to be looking directly at the horizon to know what the plane is doing. However, while under the hood, I have look directly at the attitude indicator to know what the plane is doing. If I look at something else, like airspeed for example, I won’t still be able to see the artificial horizon. My instructor had me do several more recoveries then we headed back to the airport.
We only had time for 1 landing at this point, but it still needed to be good. The airport was using runway 19 and the winds were 24014G21 (14 knot winds out of 240 degrees [50 degrees off centerline] and gusting to 21 knots). Basically, strong winds from a large distance off the centerline. As I came in, I put in the crosswind correction, aileron into wind (so the plane doesn’t get blown off course) and opposite rudder (so the nose stays lined up with the centerline). I put the upwind wheel, right main gear, down first, and quickly lowered the nose and applied the brakes. A decent landing after a pretty good day of under the hood work
What I learned Today:
Simulating flying in IMC (instrument meteorological conditions) really helps all skills of piloting. Today my scan improved, and I gained confidence with keeping my heading and altitude. Something I wasn’t ready for, but handled well was unusual attitudes. Once I heard recover, my eyes started darting all over the panel to find out the information which would tell me how to recover. In all, simulated instrument flying is fun and good practice.
After last lesson’s simulated VOR navigation, I was ready for real navigation in the Warrior. Last lesson, I practiced tuning into VORs, identifying its’ signal and tracking to or from the VOR. I did well enough that my instructor said the next flight, today, would be a real VOR tracking flight. When I checked out the weather for the day, I didn’t think I was going to fly. Clouds were all over the sky, and they kept changing on the weather reports. When I was ready for the preflight brief, the clouds opened slightly up to 3000 feet so VFR fight was possible.
After filling paperwork, getting current weather, pre-flighting the plane, starting the engine, taxing to the active runway and taking off, my instructor told me to put on my foggles while I was only at 600 feet. Foggles is a tool which allows student pilots to practice flying a plane while in the clouds, known as instrument flying rules. They look like sunglasses but are blacked out. There is a small opening on the bottom of both lenses so that while looking forward I can only see the instrument panel and not outside.
My instructor wanted me to practice IFR, also referred to as under the hood, so I put the foggles on. At 600 feet, he started instructing me to the nearest VOR, Deer Park several miles away. I looked up the frequency, tuned to it and identified the Morse code.
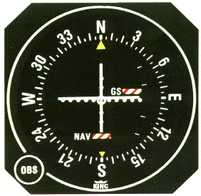
A VOR instrument inside the cockpit
|
A VOR station on the ground
|
I made my way over to the Deer Park VOR and passed over it. Once the FROM indication popped up, my instructor told me to fly To the Bridgeport VOR. Bridgeport is an airport with a VOR located on the south shore of Connecticut. While I was doing this, my instructor got on the radio with New York Approach. NY approach is the approach pilots called up before going into McArthur Airport; a class C airport. This allowed NY approach to monitor us and tell us about other traffic in the area. Once I was on track to Bridgeport VOR, I was heading north. After about 3 minutes, my instructor took the controls. I didn’t know it because I was still wearing the foggles, but we had flown over some clouds. He told me to look where we were. I took off the set and looked outside. We were only 20 feet above a cloud layer and turning to go back to Long Island. Student pilots who do not have an Instrument Flight Rating aren’t allowed to fly over clouds. I didn’t do anything wrong; my instructor didn’t know the clouds were worse over the sound. Once turned around, I started tracking Calverton VOR. Again, I tuned into its’ frequency and identified it.
Once I flew over the VOR, I started tracking FROM the station. This took us out over the Ocean now. We had flown down Long Island, which took about 6 minutes, and were headed out to sea. Finally, after making it out to the ocean, I was going to practice some maneuvers. I took the foggles off for the VOR tracking of Calverton, but for a power off and power on stall, my instructor wanted me to put them back on. I got the plane ready for the stall. I stalled the plane and couldn’t remember a thing about stall recoveries. My mind went blank and I was confused from the foggles. My instructor didn’t want me to practice another power off stall, just a power on stall this time. This recovery went a little better, but still not very good. It was a lot harder to recover from a stall while under the hood than in VFR conditions. Without the outside references, maneuvers get a lot harder.
At this point we were over Captree Island and radioed Republic tower to come in for a landing. Since the weather wasn’t so good today, there was no one else in the pattern and it took us only a few minutes to taxi back to Echo ramp
What I learned today:
VOR tracking is very important for navigation. For example, today I would have gotten lost in the clouds if I was flying alone. However, if I did get lost, than I would still know where I was going because I was tracking the VOR. Also, being proficient in maneuvers as a private pilot will greatly help me once I start instrument flying. Everything gets harder when you can’t see outside.
_ No solo today, but definitely a learning experience. After a morning full of rain and humidity, the skies opened up around 11 am, just in time for my 12:15 flight. Today’s goals were to perfect short/soft field take offs; as well as short/soft field landings. I had practiced all four of them once last semester with my last instructor, but forgot most of what you need to know in order to do the maneuver properly. Before the flight, I read up on the standard operating procedures, SOP’s, and got familiar with them
Obviously, first Drew had me practice short field takeoffs. You can’t practice landings without taking off, so I decided to do the short field first. From what I had remembered from last semester, and read in the SOP’s, they’re fun. The point of practicing a short field takeoff is because not every airport is going to have nice long, wide runways like Republic Airport has. The best way to get the most out of the plane on a short field is to line up all the way at the end of the runway.
The first step is to put flaps to 25 degrees during the pre-takeoff run-up. This allows the plane to generate lift at a slower speed. I got as close as I could to the runway threshold and lined up with the centerline. In order to get the most speed in the quickest time, you need to open the throttle while holding the brake pedals. I then fully opened the throttle so that the engine reached its’ red line rpm’s, 2700. The point of this is so that once I let go the brakes, the plane is accelerating at a greater rate than from a slow roll. As I let go the brakes, the plane jolted forward and I was at 45 knots within half a second. I checked to make sure all instruments were in the green and released the brake pedals. I called out as the airspeed came alive and waited for rotation speed. Because the runway was “short” rotation speed was 5 knots slower than normal. So once the plane reached 50 knots, not 55, I pulled back on the controls. Once wheels off ground, I lowered the nose so that the airspeed increased to 60 knots. This would have insured that I cleared any obstacle at the end of the runway, had there been one. Once over the “obstacle,” 150 AGL, I lower the nose to accelerate to 63 knots, which is Vx (Vx is the speed at which the plane will climb for the shortest horizontal distance). Upon reaching 63 knots, one notch of flaps came out and I accelerated to 79 knots, Vy (Vy is the best speed to climb so that the climb is shortest it can be in duration). Once at 79 knots, I took out the last notch of flaps and flew a normal traffic pattern.
The first landing, my instructor had me practice a normal crosswind landing (the winds were 25013G21. So they were coming out of 70degrees of runway center line at 13 knots. They were also gusting at times to 21 knots). I landed with the upwind wheel touching down first and revved up the rpm’s to start the takeoff roll again. The second landing Drew wanted me to do a short field landing. Before I start saying how they went, I’ll admit that 4 out of the 5 were real bad. I smashed the wheels down on a few of them and couldn’t hit the center line for my life. Having said that, the first one wasn’t so bad. In order to approach a short field, with an obstacle at the beginning end of the runway, you need to come in slow, 60 knots. A normal final approach speed is 65 knots. In order to come in so slow, all flaps need to be in and the nose needs to be slightly pitched up. The power is then adjusted to control the speed. The main problem I had was that the wind was knocking me around a lot. There were some attempts where I was lined up on center line, but then got blown off downwind. On another one, I had to go-around because the approach and lineup was so bad. Towards the end of the lesson, I got the hang of it. But still not to the standards that an FAA examiner would test me on.
Today, we were supposed to do four maneuvers, short field takeoffs and landings, as well as soft field takeoffs and landings. Unfortunately, because of the wind and my inexperience, we only had time for the short field maneuvers
What I Learned Today:
Landings are all about power control. Whether you’re practicing a normal approach and landing, crosswind landing, short or soft field landing, good power control is what makes the landings successful. Today, I didn’t have as good power control as I had last semester. It takes time to judge whether more or less power is needed during an approach. On some of my landing attempts, I could tell I needed more power because it looked like the ground was coming up to meet me. With more practice, I’ll get better at the landings. I think it was partially because I hadn’t gone out and done only touch and goes since last October and also partly because of the wind. I know that I have good power control; I just need to find it again.
_ Still waiting to do my last solo. What stinks is that I can’t go onto the next lesson until I fly my third and final solo. The course is designed so that stage 1 is soloing, stage 2 is cross country and stage 3 is passing the private pilot solo flight. So because I can’t do the last solo, I can’t move on to the next stage. The only reason I didn’t do it today was because the weather didn’t allow it. The skies were clear up to FL180, but the winds were strong, and gusty. There was even a low level wind shear advisory for the airport. So instead of my solo, I practiced stage 1 maneuvers with my instructors. Last time up, which was the first time in over 6 weeks, I was a bit rusty. Today, however, went much better. Also last time, I didn’t show my new instructor any ground reference maneuvers. Because he’s a new instructor for me, he needs to see where I’m at in my ability to fly an airplane. Which means that I need to show him everything I know how to do. So today I did both turns around a point, and S turns. The flight started out good. I did a right downwind departure so I could go south, out over the ocean. Since the runway we were using today, runway 32, faces north, northwest, a downwind departure means I stay in the pattern until I’m in a downwind for the runway but continue to climb up to whatever I want. So after doing the departure, Drew gave me his foggles so I could practice instrument flight. Private pilots need a minimum of 3 hours instrument time before they can pass the FAA test to get their license. I climbed, and headed out to the Atlantic Ocean while “under the hood” (the term for wearing the foggles.) After we got to the practice grounds, about 10 minutes after takeoff, Drew had me do slow flight, which went better than last time, a power off stall and a power on stall. Since we were at 3000 feet for these maneuvers, he cut the engine so I could practice an in flight engine failure landing. When I got to 1000 feet, I leveled off so that I could do the ground reference maneuvers. I did the circle around a point first. I picked the Jones Beach water tower and set the plane up for 90 knots, and 1000 feet. I got the weather reports so I could enter the maneuver in the downwind. After preparing the plane, I headed towards the water tower to start the maneuver. Once I was abeam the point, I banked into a steep turn because I was going with the wind. (While in the downwind, the speed is greatest. So in order to not get blown too far downwind, a steep bank allows the circle to be turned tight). I got 90 degrees through the turn and took some bank out (while in the upwind, speed is reduced due to a headwind. This means that in order to not make the turn too tight, and spiral into the reference point, bank must come out). It was when I was about halfway around the first turn when something happened. As I was looking at the tower to keep myself equidistance throughout the turn, I heard “O Shit” from my instructor. He said it loud and firm, so I snapped my head forward to be looking directly at a Cessna 172, within 100 feet of my Piper Warrior III. As my head was turning to look forward, Drew had taken the controls from me and banked the opposite direction of the turn I had been doing. He opened the throttle full and quickly sped us away from the area. It took us another 20 seconds to make visual contact with the Cessna again. He was flying low over the inner shore line. We were over the outer shoreline at this point; meaning we were almost 2 miles safely away from him. What happened was that while I was doing my turn, the Cessna dropped right in front of us. It’s weird that it happened because the Cessna has high wings. This means they have good visuals below the aircraft, which we were. I had done my clearing turns to make sure no other planes were in the area. Later in my flight while I was on an 8 mile final, we saw the same Cessna again flying across out flight path, just below our attitude. We couldn’t ID the plane, but it wasn’t company traffic (company traffic simply means it was from the same company as me. Our company is Farmingdale Aerospace flight school. Often, when telling pilots who to follow in the traffic pattern, the tower controller will tell us to “follow company traffic 2 miles ahead.” That means that we’re following another Farmingdale airplane who is 2 miles ahead of me.) The close call was the closest I’ve been to another airplane while flying since I began my flying career five months ago.
What I Learned Today:
Make sure to do clearing turns before every maneuver. Even though I did both of mine, the other pilot seems to not have done his clearing turns; or he /she might have lost their bearings. Either way, it’s imperative to know where you are at all times, and who or what is around you. This is called situational awareness.
In the first stage of flight training, for the private pilot course, you learn only a handful of maneuvers. Flying an airplane isn’t very hard, or at least it was easier than I was expecting. The airplane I’m using now, the Piper Warrior, (go to the ‘ Airplane’ section under ‘Base Airport’ to learn more about the Warrior), is very stale and beginner friendly plane. It’s a really great airplane to learn to fly in. Anyway, flying an airplane is fun; not only do you have to direct it left, or right, and accelerate or decelerate, you need to monitor altitude. With that in mind, I’ll go over the maneuvers I’ve learned so far. The first maneuver I was taught was slow flight. Slow flight is important because it simulates the traffic pattern. At slower airspeeds, the airplane behaves differently. The control surfaces are less effective and the pilot needs to rely on the rudders to control where the airplane goes instead of the ailerons. The hardest thing about slow flight is that you’re only a split second away from a stall. When done properly, the entire maneuver should be conducted with the stall horn aloud. The stall horn is sounded when the airplane ‘senses’ a stall. What I mean is that on the leading edge of the left wing, there’s a little flap that will move around when not enough airflow is traveling over it. This occurs at slow speeds and a high angle of attack (AOA). With the stall horn on, and all the flaps put in, you need to be able to climb, descend, or turn the airplane. However, to ascend, you need to apply power since you can’t pull back on the controls. Dong so will increase the AOA and cause a stall. The same goes for descending, except reducing power. In slow flight, lowering the AOA will cause the plane to gain speed, and fly out of slow flight. Slow flight is definitely the trickiest maneuver for me in the first stage. The stalls are important to learn because what you’re really practicing is stall recovery. The instructor needs to show you how to recover from a stall when one occurs. There are two common types of stalls, the power on stall and the power off stall. The power on stall simulates a stall if the pilot pulls up too much and too quickly during a takeoff. During a power on stall full power is applied at the rotation speed (rotation speed is the speed at which the plane can become and sustain lift) plus 5 knots. In essence, you’re simulating that you’re on the takeoff roll and rotating. Once you apply full power, you pull back on the controls (yoke) to simulate that you are taking off with too much AOA. The recovery for this is easy; you just lower the nose to regain smooth airflow over the wings. The power off stall is a little more involved. It is my personal favorite maneuver so far because I find it fun. The stall is used to simulate that you took too much power out during a landing and have stalled the plane. To perform the maneuver, you establish a 3 degree descent to simulate an approach to landing. Then once at the ‘deck’ altitude (the altitude that is representative of the ground), or just above it, you take all the power out as to simulate that you’ve flared (a flare is the part of the landing which brings the nose up so the back wheels can touchdown first). As you do this, you increase back pressure on the yoke to simulate that you’re flaring too high. With no power and a high AOA, the airplane will stall. I like this maneuver because once it stalls, the nose drops dramatically towards the surface. The second this happens, you apply full power, step on the right rudder pedal to counteract the left turning tendency, and take out the first notch of flaps. It’s fun because you have to do a few things at once. The first time I did it correctly, I felt like I was Tom Cruise in top gun. The last set of maneuvers in stage 1 of private pilot is ground reference maneuvers. The point of these is to practice flying with a reference point on the ground. There about 4 or 5 of them, but so far, I’ve only learned two. The first is turns around a point. The goal of this is to pick a point on the ground, and complete a circle around it while keeping a constant radius, as well as speed and altitude. The tricky part is playing the wind. If the wind is blowing hard form one direction, it’s going to blow you farther and faster when you’re in the downwind. This means you need to increase the angle of bank. While in the upwind, the angle of bank is shallower because you’re going against the wind. It only took me a few tries to get the hand of it, and of course the stronger the wind is, the harder the maneuver’s going to be. The second ground reference maneuver I learned was S turns. This is done along a straight line, usually a road or straight beach. It is done at the same altitude and speed as the circle around a point. The difference is that once you make a half circle, you need to turn in the other direction and complete an S shape. It’s hard to picture it in your head if you’ve never done it before. The goal is to make the half circles the same distance away from the reference line. If you can be efficient with turns around a point, than the S turns become a lot easier. The last maneuver, while not being a true maneuver, is landing. This is important because anyone can takeoff, landing is the tricky part. The first month that I did landings, my instructed never let go of the controls. He held on to them until I could prove that I was able to do them sufficiently without any help. The maneuver we do is called a touch and go. This means that I land, and once on the ground, I retract the flaps and apply full power and takeoff again without leaving the runway. After a month of doing about 5 touch and goes at the end of each flying lessons, I became comfortable and confident with my landings. The maneuvers I’ve learned so far were challenging at first, but once I got the hang of them, they become fun and easy, almost boring.
|